Cloudflare is a free reverse proxy and content delivery network that speeds up sites by siting between the web visitor and the webhost.
When I got started with WordPress, one of the things that bothered me was the security issues associated with running a site built on PHP.
Open source CMS websites attract have-a-go hackers like you wouldn’t believe. Because many of the hacking attempts come from automated bots and brute force subroutines, keeping this garbage away from your site is crucial.
Without adequate spam control a WordPress site will overflow with junk/fake comments. I hear about bloggers having their sites crashed from spam… and this is WITH a dedicated hosting server, not shared hosting.
You’ll be pleased to discover Cloudflare can help combat some of these issues for free. The software sits between your website and the big bad internet. It acts like a shield for your particular bit of web space and also helps speed webpage load time using caching.
Protective Layer at the Hosting Level
If you ARE a WordPress user you’re probably already using security plugins like the free iThemes Security plugin (formerly BetterWPSecurity) and WordFence, but it’s not enough.
Cloudflare is not a WordPress plugin. It’s a service you sign up for and is designed as a layer for the webhost and is suitable for any type of website, not just WordPress.
There is an official Cloudflare WordPress plugin to compliment the service, and is handy if I ever want to clear the cache for individual pages after making updates to HTML.
Cloudflare filters out a lot of the junk and debris of cyberspace – the low quality or suspicious traffic out there is less likely to get through and hit your origin server.
Crawlers, bots and attackers will have a tougher time getting through. A lot of “bad traffic” comes from Russia, for example.
If you’re in what’s informally known as a spammy neighbourhood (you’ll kick yourself for all those low quality directory backlinks 5 years ago) you could regard Cloudflare as putting bars on your doors and windows.
A better way of understanding the service is the two images below which have been taken from the Cloudflare website.
Cloudflare Is Also a Caching Service
Cloudflare acts as a cache because it is a Content Distribution Network (CDN).
If your server crashes or has downtime, Cloudflare will do its best to still show your site from the last known successful cache.
A few years ago I forgot to renew a domain on a personal website, so for 24 hours there was technically no service.
But I checked the site and it was still up – thanks to Cloudflare and its cache.
Content Delivery Network
The CDN uses 28 data centers around the world – server mirrors – which helps speed up the delivery of your site files to the visitor’s browser.
To put it simply, your webhost bandwidth usage will be lowered and everything will load faster.
Wherever your site visitors are in the world, Cloudflare will download the files from whichever data point is nearest to them.
Because of this cloud server approach, DoS attacks are less likely to be effective because the majority of the traffic used in the attack will be absorbed by the data points.
Purging the Cache
If you’ve been editing your stylesheet or replacing images but your changes aren’t showing, it’s more than likely you need to clear the CF cache.
You can access the cache settings by logging in and accessing the Settings Overview for your domain.
There, you’ll see a button called Purge cache.

Remember to clear the cache when updating your site design
Disable the Cache for the WordPress Back End
Recently, I noticed issues with the dashboard area for several WordPress sites I manage. When I tried to edit posts or expand widgets, nothing happened. No response.
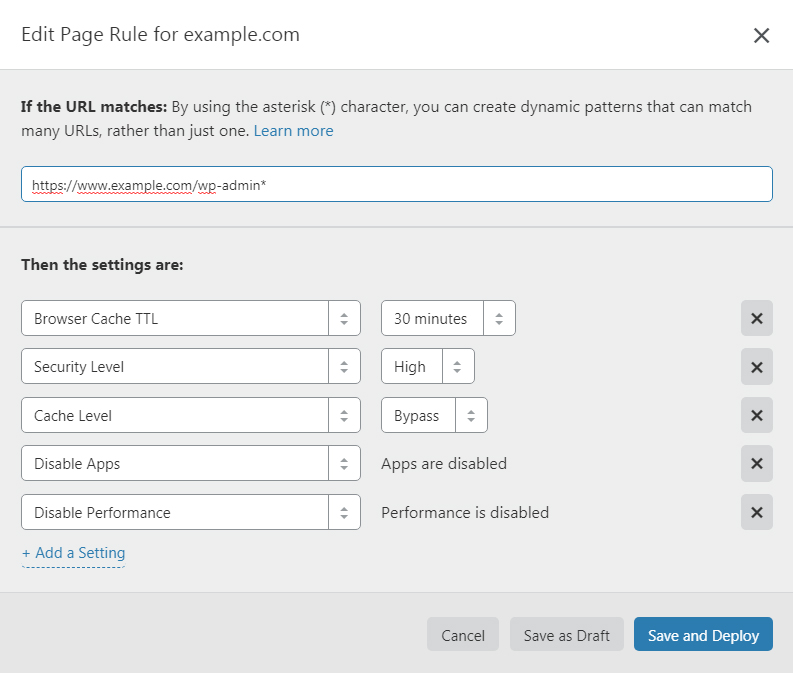
The solution is to go to your Cloudflare dashboard, and choose to create a Page Rule. There are various handy Cloudflare configuration guides online such as this one.
You’ll need to to add the following settings to prevent any Cloudflare caching being applied to the WordPress backend:
Free Cloudflare Plan & DreamHost Integration
I’ve installed the free version on all my WordPress websites. I did this initially through DreamHost because they are a partner with Cloudflare.
The webhost partner method of installing Cloudflare on each domain is quick but you must first sign up to a regular free Cloudflare account. Then access the DreamHost dashboard, visit the Manage Domains section and enable Cloudflare on whichever website you want.
Enable Cloudflare on your chosen domain. You’ll be prompted to enter the username and password you used to sign up for your account.
You can clear the Cloudflare cache from within DreamHost, which is handy.
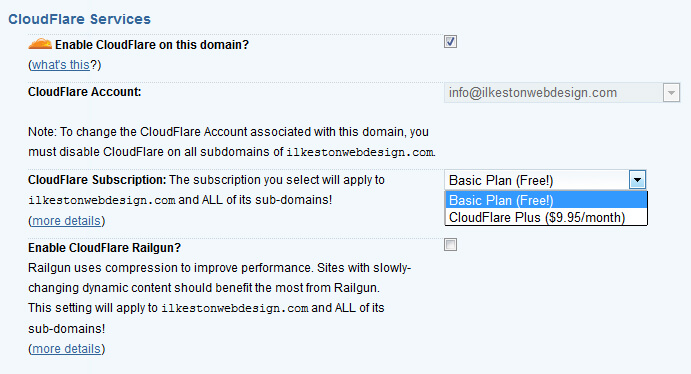
DreamHost is partnered with Cloudflare so set up is easy
Personally, I prefer to set everything up manually over at the Cloudflare site, which actually involves changing the nameservers yourself. It’s actually easy.
This way, there are more detailed and granular controls.
If you want to upgrade to Cloudflare Plus you can do so but you might want to stick with the free version for a while.
Free Cloudflare Plan & Integration with Other Webhosts
If your webhost is NOT affiliated with Cloudflare, this means you’ll have to manually route the service yourself. It’s not hard, as I said a moment ago.
This is achieved by adding your domain in the Cloudflare control panel and then change your nameservers in your domain’s DNS.

You can add domains manually through the Cloudflare dashboard
Cloudflare Analytics
However you add the service to your sites, you’ll get an analytics reports section in the dashboard.
It’s pretty interesting to see just how much traffic is bogus and what is legitimate.
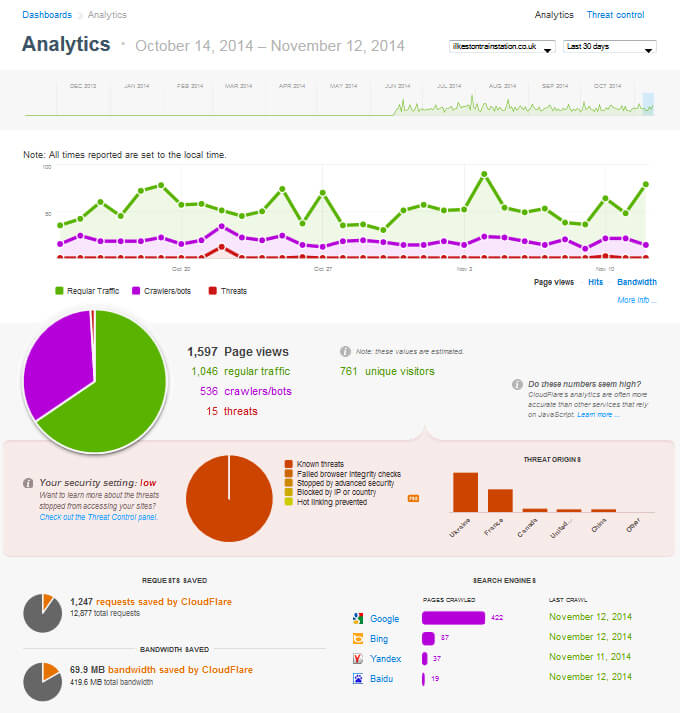
The analytical reports are cool. This is the free plan, by the way.
I set up an experimental website a few years ago on the subject of proposed local transport development.
Bearing in mind this website is about a railway in a small town in England, I was surprised to discover so much traffic was coming from Ukraine!
Of course, this is probably not real traffic, but server requests originating from a Ukrainian I.P. address.
Free SSL/TLS – A Good Thing?
A while ago Google indicated TLS would become more important. They didn’t specify how exactly, but as you can imagine, a lot of SEOs got over excited.
Then Cloudflare announced out of the blue they would be adding free SSL to all free accounts. This means sites with universal TLS enabled will get the https:// secure prefix.
My understanding of these free TLS certificates on their own are just self-signed certificates.
However, Let’s Encrypt is a free “signed” security certificate authority that can be added to your website, before you add Cloudflare.
Summary: Essential and Amazing Free Service That Any Site Can Benefit From
Cloudflare is worth having for any site. It adds a protective layer, caches your pages and improves performance.
If you’re already using a WordPress caching plugin such as W3 Total Cache, get rid of it. I had this installed a while ago but found in combination with Cloudflare there was no need. Total overkill.
For what it costs (free) Cloudflare is excellent. You only to spend a little time configuring this excellent tool… and you’ll avoid plenty of headaches down the road.



Hi darren im building my site offline but should i wait until i have everything uploaded to my server before adding CloudFlare?
You said on Twitter that a reverse proxy can interfere with a WordPress deployment from a backup plugin – you said it caused a timeout error?
Please advise because I want the migration to go smoothly,
cheers. Paul
It might be better to set up CloudFlare after you’ve migrated your WP installation to the host.
I tried to deploy a Duplicator package to my GoDaddy shared Linux host and I kept getting a timeout error – it was a 522 Error. I contacted GoDaddy support and told them I was using a reverse proxy but they said that wouldn’t be it. They were wrong.
So yeah, add CloudFlare last, or, if you do set it up on the host before you upload the website, disable it temporarily.
The size of your WordPress package plays a part too so keep that in mind.